Tuesday 8 October 2013

Honey Caramel Urfa Biber Iced Cream


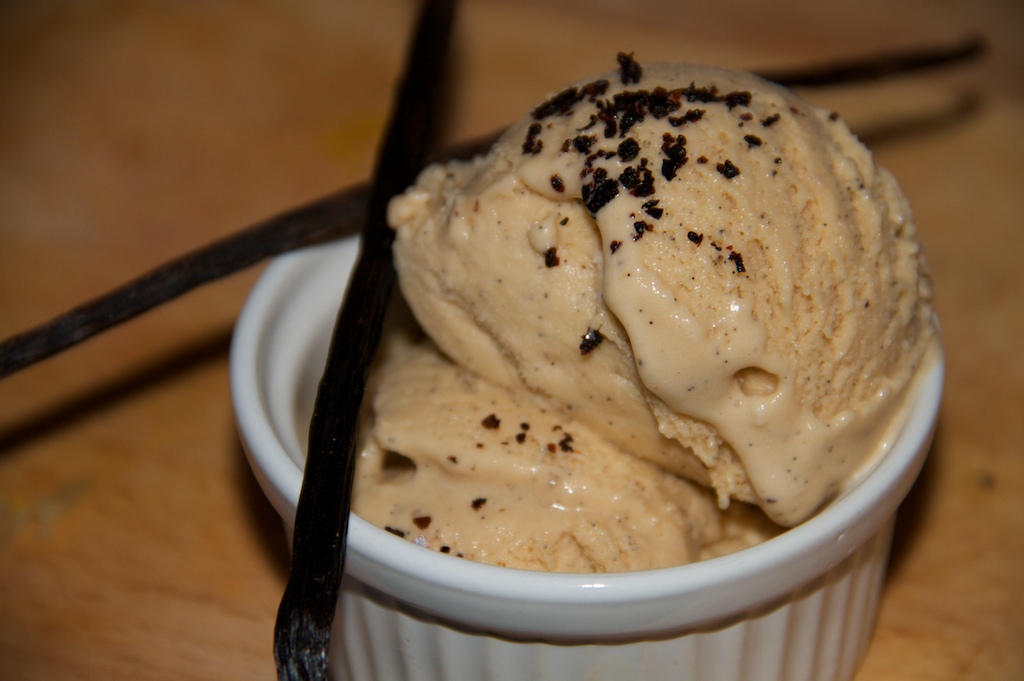
I have experimented with a couple varieties of iced cream this summer. And this one was the most popular. It has just the right amount of sweetness with a touch of heat.

The "Urfa Biber" is a unique pepper indigenous to the Urfa region of Turkey. Also known as an
"Isot Pepper," is much like a bell pepper, but with heat. Which is picked when ripe, and then processed by being sun dried during the day and goes through a sweating process at night. This process is anywhere from 4 - 12 days, and determines the heat and colour of the peppers. It can range anywhere from dark red to a dark purple in colour. If you can find this pepper, you are in for a major treat. It's described as sweet, like sundried tomato, vanilla, chocolate, & cherry with a hint of tobacco. And pairs well with savoury or sweet dishes.
It is truly an amazing pepper.


 Honey Caramel Urfa Biber Iced Cream

Ingredients

1 vanilla bean or 2 tsp of vanilla extract
1 tbs Urfa Biber {Turkish pepper}
1/2 cup cane sugar
1/2 cup honey
1/4 cup water
2 cups whipping cream
1 cup  whole milk
7 large egg yolks

Instructions

1)  Add sugar, honey and 1/4 cup water to a sauce pan and stir over medium-low heat until sugar dissolves.
2)  Increase heat and boil without stirring until syrup turns deep amber color, occasionally brushing down sides of pan with wet pastry brush and swirling pan, about 8 minutes. ~Remove from heat. Add in the whipping cream, Urfa biber and vanilla (mixture will bubble vigorously).
3)  Stir over low heat until any caramel bits dissolve, about 4 minutes.
4)  Add milk; bring to simmer.
5)  Whisk yolks in large bowl to blend.
6)  Gradually whisk caramel mixture into yolks.
7)  Return custard to saucepan and stir over medium-low heat until custard thickens and leaves path on spoon when finger is drawn across, about 5 minutes (do not boil).
8)  Strain custard into large bowl; refrigerate until cold.
9)  Process custard in ice cream maker according to manufacturer’s instructions.
10)Transfer ice cream to covered container and freeze until firm.

special note:
I found the Urfa Biber at the Silk Road Spice Merchants In Calgary, Alberta, Canada.
http://www.silkroadspices.ca/products/urfa-biber


Wednesday 24 July 2013

Salted Peanut Butter Cups {Raw*Vegan}


These are literally the most delicious little treats ever invented. And everyone has there own provisions to the same recipe.. you could even experiment with our own version.!
I'm not going to lie to ya~ Mine is pretty rich. Moist. Sweet. Salty..
......mmm
I wish I was eating them right now...
Lets get started :)


Crust
{ recipe adopted from my mini key lime pies} 

1/4 cup raw shredded coconut
2 tbs extra virgin coconut oil
1/4 cup raw pumkin seeds
1/4 cup raw almonds
5 madjool dates
2 tsp honey
1 tsp hemp seed butter> or cashew butter
1/4 tsp cinnamon
1/8 tsp sea salt

Put all ingredients in a food processor until blended. BUT first start with the almonds and seeds,
as they need the blade to break down their tuffness.
Then add all other ingredients until blended and sticky :)

Chocolate Sauce

you can use 2 methods depending on what you have available:

1} 1/2 cup -70% dark chocolate chips or bar.
Melted down with 2 tbs pure coconut oil and 2 tbs maple syrup, over a double boiler method.

2} 1/2 cup cocoa powder. Melted with 2 tbs pure coconut oil and 2 tbs heavy cream, over a double boiler method

Assemble

Layer your crust in the bottom of a mini muffin tin, making sure to leave room for the other good stuff. Dollop on some of your favourite all natural peanut butter and drizzle with the melted chocolate. And refrigerate for 1/2 hour to let the cocoa set.
Finish with some flaky sea salt. MALDON or Fleur de Sel, Celtic Seal Salt


*Recipe makes about a dozen mini peanut butter cups.

Feel free to play around and let me know how they turn out!


Little mini Coconut, Key-Lime Pies {Vegan/Raw}


Making healthy bite size deserts really are the highlight of my day. And what a good way to end the day!  Super easy to make and even more so to eat.

Depending on your sweet tooth, mine is really sweet. I didn't want to use as much sweetener, but you could definitely use more dates or honey, if you desire to. And I also discovered that they don't last long... Not because they are so damn delicious they will disappear!  although they will~  But the filling {made of avocado } goes too ripe overnight...
which is pretty sad, if they last overnight  :)

Hope you enjoy!


Filling

1 large whole avocado or 2 small
1 lime {zested and juiced}
1 tsp honey
1 tsp pure maple syrup
1/4 banana

Blend all ingredients in a food processor until smooth. Taste to your sweetness satisfaction.
Put the filling in a bowl and refrigerate.


 Crust

1/4 cup raw shredded coconut
2 tbs extra virgin coconut oil
1/4 cup raw pumkin seeds
1/4 cup raw almonds
5 madjool dates
2 tsp honey
1 tsp hemp seed butter> or cashew butter
1/8 tsp ground cardamom {optional}
1/4 tsp cinnamon
1/8 tsp sea salt

{ You don't even really have to wash the food processor before this next step, is all going to the same place :)}
Mix all ingredients in the same food processor until blended and sticky. BUT first start with the almonds and seeds as they will need some encouragement.  Then add all other ingredients.
When finished. Transfer mix into the base of a mini muffin tin. Filling as full or as mini as you want really.
And top with filling. Garnish with raw or toasted coconut! easy pleazy!


This recipe does makes about 25 mini pies>LOL> So it may be wise to share with loved ones or share the love at a pot luck dinner!!


Thursday 30 May 2013

Kale Salad with Tahini Lemon Dressing


I'm not gonna lie to you :)  Kale is a vegetable I had a hard time getting to know... Like Olives I had to acquire a taste for.
But for those of you who like kale + olives, this recipe is a lovely combination. Is a cinch to make and will compliment well to any main dish.


Kale Salad

Ingredients

1 tbs olive oil
1 large bunch of kale chopped
1 large hand full of green beens {aprx 15}
1/4 cup black olives or kalmatas pitted
1/4 cup pine nuts {optional}
1 tbs sesame seeds

Start with cutting the end of the beans off. It is your choice if you want to keep the beans long or short. I liked having them long in this salad. Pit your olives if they aren't already.
In a sauce pan, warm 1 tbs of olive oil and saute the beans on low to medium heat. We still want the beans to be crunchy when we serve the salad, so only saute for about 2 minutes. Add your kale in chopped pieces, the olives { pine nuts)  and turn off the heat and cover to steam, for about 5 minutes.
While you are waiting for your kale to steam. Start the dressing.

Dressing

1 tbs olive oil
2 tbs tahini paste
6 tbs lemon juice
6 tbs water
1 tsp nutritional yeast{optional}
finished with cracked black pepper

Transfer your salad to a salad or serving bowl and toss with the dressing.
Garnish your salad with sesame seeds.

Healthy Tip
Kale is full of antioxidants and high in magnesium. And Tahini which is a Mediterranean sesame seed paste is really high in calcium. Way higher than milk.!  And Magnesium in combination with Calcium will help with absorption of these minerals to your bones and muscles. Which makes this meal a perfect after work-out meal!

Served this salad with salmon or chicken for a great combo :)


Tuesday 7 May 2013

Portabella & Goat Cheese Tower

This meal is honestly one of my all time favorites. Mega easy and and can be a side dish or the main event! Play around with all kinds of herbs you may have handy.  Try adding roasted eggplant, pine nuts or walnuts, and drizzle with olive oil and balsamic vinegar. For a beautiful dinner for 2.


Raw Mushroom Tower


Ingredients needed:

 one egg
 1 whole tomato
 eggplant{optional}
 2 large portabella mushrooms
1/2 cup goat cheese
1/4 cup almonds
1/4 cup cashews
1/8 cup parsley
 2 tsp thyme
 2 tsp rosemary      
 sea salt and pepper to taste


Directions

Rough chop almonds, cashews and herbs together. If you have a food processor this step will be be a cinch. Then transfer the mix to a bowl. Next drop the full egg in a separate bowl and lightly beat until smooth. Then you are going to roll out your goat cheese into a ball with your hands and drop it in the  egg batter, until the cheese is covered. Then transfer the cheese to the nut bowl and coat it with as many nuts as you can.  Assemble the portabella on a baking sheet, season it with salt and pepper, and olive oil, top the mushroom with eggplant if you are using it, and brush it with olive oil, salt and pepper. Then fresh tomatoes and the coated goat cheese.


2 Day Fresh Juice Cleanse


You might be here looking for some new juicing recipes, or you may be new to juicing and asking yourself what is the purpose of juicing. Or what are the health benefits?
First of all a juice cleanse isn't a diet. I don't believe in dieting. I believe in living my life and eating what I want. We live by the choices we make.  Play with food, and enjoy with curiosity!

The main reason to juice is to give your digestive system a break. Consuming heavy meals on a regular basis can use all your valuable energy to digest. Juicing is a much needed break and reboot of our system. Juicing breaks apart the fiber from food, so it is quickly and readily absorbed.
Our bodies are naturally trying to reach homeostasis, a naturally healthy, alkalized environment.
Taking a juice break regularly will assist in achieving a healthy you. And naturally help boost your energy.


First start your morning off with a glass of lemon aid:
per glass: 1 lemon wedge, topped with filtered water, pinch of sea salt, 1 small tsp warm honey.

And feel free to drink as much water as you want throughout the day.

~Lemons helps stimulate hydrochloric acid, which helps break down food for nutrient absorption. Lemons are also high in vitamin C, and are naturally detoxifying...
You will find lemons in all of my juice recipes.
As I also start every morning with a glass of lemon-aid.

I found these great to-go jugs that I used for my juices, but you could also use mason jars or anything else you may have handy for transport. you don't want to be left empty handed and hungry through the day.


                                JUICE RECIPES


Orange  {Breakfast}

6-8 organic carrots
2 oranges peeled
2 apples
2 lemons peeled

 Unfortunately citrus has to be peeled before it can be juiced. Otherwise your juice will turn out
1) too pulpy
2) too bitter..

Recipe yields about 6 cups of juice.
Package and refrigerate what you aren't going to drink that morning.


Red  {Lunch}

4 large beets peeled
1/2 cup fresh cranberries
1 grapefruit peeled
1 lemon peeled
4 celery stocks
1 apple

I was never the biggest fan of beets growing up.. I had only ever had them cooked and the texture really threw me off.. until I tried them raw on a salad, and was then awakened to their awesomeness. They were sweet and crunchy and full of life!
And in this blend they are truly stand out with all kinds of flavor.

Recipe yields about 4 cups
Package and refrigerate


Green   {Dinner}

1 large cucumber or 4 small
2 apples
1 bunch parsley
1 bunch cilantro
1 heaping handful of spinach or kale
2 lemons peeled
4 stocks celery
1/4 whole pineapple peeled

This one might need some finagling to get the leafy greens in there. You will need to push parsley and cilantro leaves through the juicer with the cucumber and celery stock.
This blend is  rich in enzymes, vitamin-c and magnesium to help detoxify your liver.
Cilantro has the ability to attach to heavy metals and extract them from your system.

Recipe yields about 4 cups of juice.


Home Made Almond Milk  {Dessert}

I will also have other homemade nut milks on a separate post as well, with more detail and variations
{not yet posted}

Ingredients:
  • 1 cup raw almonds
  • .5 cup cashews
  • 3.5 cups filtered water
  • 2 pitted Medjool dates or 1 tsp maple syrup
  • small pinch of fine grain sea salt, to enhance the flavour 
  • 1 tsp pure vanilla extract
  • pinch of cinnamon
You are going to want to soak the nuts first, ideally for about 6-8 hours. 2-3 hours if you are in a hurry..
Then rinse them off and throw them directly into your blender, with new fresh water and the dates. Blend until smooth, about 4 minutes. Then you are going to have to milk the nuts  {separating the nuts from the milk} with a cheesecloth or nut milking bag. Don't discard the almond meal, you can use it for baked goodies! Rinse out the blender and toss the milk back in with the vanilla and salt.
When you are ready to drink your almond milk, dust the top with a pinch of cinnamon for added desert flavor. Or even add Raw cocoa powder for a natural chocolate milk!!

*Pictures to follow{keep posted}
Recipe yields about 3-4 cups of milk
and 2 cups of nut pulp for cookies.


Explore many other fresh juice flavors. Use any other fruit and veggies you may already have available at home. And get juicing!

Peace.Food.Nutrition.


Monday 6 May 2013

Raw Coconut Banana and Pineapple Ice Cream


This recipe is naturally sweet and naturally satisfying.

I do admit I have a bit of a sweet tooth. And my pleasure is finding and making recipes that satisfy my cravings with out compromising my immune system.
By that I mean, over indulging in refined sugar and preservatives that are in almost all commercial iced creams and treats.

This blend will be a crowd pleazer among everyone, young and young at heart.:)

Ingredients

1 can coconut milk
1 frozen banana
2 tbs of honey
1/4 cup pineapple puree or pieces
{organic ingredients when possible}


Directions

Put all ingredients in your blender until smooth.  Then transfer to an iced cream maker if you have one, and follow manufactures instructions.
Or to a metal bowl, and then transfer to the freezer for the old fashioned way.This method you will have to pull out of the freezer and mix the iced cream by hand, by mixing every couple of hours. This will break up the ice crystals and smooth out the texture you desire.
If you do want it a bit sweeter, add in more honey to taste. But the combination of fruit and honey makes it pretty sweet. It will also depend on the ripeness of the banana.

Pull it out of the freezer when ready, and have the whole family enjoy~ if your willing to share ;)


Sunday 14 April 2013

Cranberry Beetroot-Almond Chocolate Cake


Beets are another under appreciated food in my house. But can also be sneakily disguised into an awesome dish!

This cake will surprise you! It is rich, moist and flavorful. And will keep for up to a week :)


Ingredients
  • 3 medium beets, cooked and cooled
  • 1/4 cup coconut oil
  • 1/2 cup  virgin olive oil
  • 3/4 cup pure maple syrup
  • 1/2 cup honey
  • 3 medium eggs
  • 2 teaspoon pure vanilla extract
  • 1 cup organic, coconut flour
  • 1 cup almond meal or almond flour
  • 3/4 cup cocoa powder
  • 2 tbs black onyx cocoa
  • 2 teaspoons baking soda
  • 1/2 teaspoon sea salt
  • 1/2 cup frozen cranberries

Instructions
  1. Boil your beets with skin on. Test if they are done by poking with a knife or skewer. And cool. You can then easily rub off the skin with your hands, or rubber gloves. This process will preserve the colour and flavour of the beets.
  2. Preheat the oven to 350F. Grease a 9 inch cake pan with coconut oil and dust it lightly with cocoa.
  3. In a food processor mulch whole raw almonds until desired flour like texture occurs. You may need to push the almonds down the sides of the bowl.
  4. Grate the cooked beets on a box grater or on grater attachment in food processor and measure them; you should have about 2 cups of grated beets.
  5. Transfer beets to you food processor with almond flour and then adding in the coconut oil, olive oil, maple syrup and honey until everything is well blended.
  6. Adding eggs, one at a time, and blend until smooth. Add the vanilla extract.
  7. In a separate bowl fold together the flour, cocoa, baking soda and salt. Gently fold the flour mixture into the wet ingredients.
  8. Fold the frozen cranberries into the batter until distributed, then scrape the batter into the prepared cake pan and spread around until it is even.
  9. Bake for about 35-45 minutes, until a wooden skewer comes out clean. Remove from oven and allow to cool, in the pan on a wire rack, for a good 20 minutes.
  10. Carefully invert the pan onto a cutting board, tap gently, and the cake will drop out. Dust with cocoa powder or melted chocolate. Serve warm or cool

  Black Onyx Cocoa Powder has been alkalized to the highest extreme. Producing a dark, purplish black cocoa that makes for an impressive black/rich baking good. This extreme alkalization neutralizes the natural bitterness, removing some of its chocolate flavor and a lot of its butter fat(10-12%).
Is also not recommended to use by itself, as it is too rich. Always cut with another cocoa of choice to compliment the flavor.


“All you need is love. But a little chocolate now and then doesn't hurt.” 
-Charles M. Schulz 


Enjoy Food with Curiosity~  Peace.Food.Nutrition 


Tuesday 9 April 2013

Chocolate Chip and Cardamom Cookies


Cardamom  has a very distinct flavour, that can not be replaced. It is most widely used in Middle Eastern, Morrocan and Indian cooking. And is now becoming more recognized in the Western cooking. It is a very versatile spice used in savory and sweet dishes.
Health claims for cardamom in Ayurvedic cooking, is that it is a warming spice. Promoting circulation and is a vasodilator... but really.. I just wanted to play with the flavour, because it has such an amazing aroma.

These are not going to last, so I recommend doubling the recipe and freezing some :)


Ingredients


1/4 cup coconut oil
1/4 cup brown sugar
1/4 cup cane sugar(sucunat)
2 tbs real vanilla extract or  equivelant 1 vanilla bean seeded
2 large eggs-or 3 small
1 tsp of ground cardamom seeds
1 cup coconut flour
1 cup spelt flour
1tsp baking soda
pinch of sea salt
1/2 cup chocolate chips or chopped pieces
1/2 cup of water or milk


Directions

  1. Preheat oven to 350 degrees F (175 degrees C).
  2. Cream together the coconut oil and sugar until smooth. Beat in the eggs one at a time, then stir in the vanilla. Stir in dry ingredients, cardamom and then chocolate chips. Add a couple of table spoons of water at a time to bring the dough together. Drop by large spoonfuls onto an un-greased baking sheet.
  3. Bake for about 10 minutes in the preheated oven, or until edges are nicely browned.
I dare you to try and NOT have one right out of the oven!
 They will seduce you, they are so delicious.

Recipe makes 10-12 cookies


~Enjoy food with curiousity 


Marinated Eggplant, Roasted Garlic and Cilantro Thin Crust Pizza.


I am inspired to open peoples eyes to delicious food. Take the eggplant..believe it or not, not a fan by most people... Take my boyfriend Tanner. Every time I bring an eggplant home he just rolls his eyes. And the poor eggplant always gets ignored and just ends up in baba ganoush. Dont get me wrong, baba ganoush is awesome. But it's the only way he eats eggplant and that gets boring pretty quick. Why should this unique vegetable be ignored, when it has so much potential!

I found these amazing Japanese eggplant at the farmers market. I took some initiative and surprised him by putting it in some of his favorite dishes. He didn't even notice until I mentioned the ingredients!

This week I was feeling kind of inspired to try something new. This recipe will work best if you use the Japanese eggplant compared to the American version, as they are more firm and will hold their shape better on a pizza.


There is a bit of time preperation for this recipe. So I recommend preparing some ingredients the day before hand or on a day off when you have some leisure. Read through the whole recipe before starting.

Enjoy food with curiosity!


Main Ingredients needed:
Whole garlic bulbs, red bell peppers, japanese eggplant, sesame seeds, fresh cilantro, parsley,
hoisin sauce, braggs or soysauce, chili flakes, honey, tamarind paste, boccacini mozzarella,  
fresh parmasan, corn meal.

 
Roasted Garlic

I like to roast about 6-8 bulbs at a time so I always have some on hand.
But if you are starting some for this recipe, start with preheating your oven to 350'c.
Take your garlic bulbs and make a straight cut off the top of the bulbs. Lay the root side of the bulbs flat in a loaf dish or small frying pan and drizzle olive oil in the center of each bulb. And bake for about 45 -1 hour. Until golden brown. Wait until they cool, and just squeeze them out of their shells.


Roasted Bell Peppers

These peppers are something else you might want more of on hand.
You can use red, orange or yellow peppers as well, but I wouldn't recommend green, as they are not as sweet. You can also buy roasted peppers, but I can promise you they won't be as sweet as roasting them yourself.

Roasting bell peppers you can do on the stove element if you have a gas stove, on the BBQ or in the the oven on broil. I did them in the oven, in a loaf pan. At 450'c for about  15  mins. You want the skin to look charred. And be sure to turn the peppers over to ensure even cooking. Once they look charred evenly around the pepper, take out of the oven, and put in a sealed container until they start to sweat. Once they have cooled down, you can simply just peel off the skin, and slice into strips.


Marinade for Eggplant. 

1 tsp tamarind paste if you have it, or honey
1tbs hoisin sauce
1 tbs braggs or soysauce
1/2 tsp chili flakes
2-3 tbs water

Recipe is only enough for 1/4 of the eggplant. Cut the eggplant into thin half moon pieces or quartered pieces and marinade in a tupperware container for at least 6 hours. You will probably have to shake it up every couple of hours to ensure all the eggplant gets some flavor.


Pizza Dough

3/4 c water
1 tsp honey
1 tbs yeast
1/4 tsp seasalt
2 cups flour
cornmeal or cornmeal flour for rolling

I am always so disappointed whenever I come across a recipe for homemade pizza, to find they used a store bought pizza dough,  when its so easy to make!
You can use a bread maker on the dough timer. Or by hand, kneading the dough in a warm kitchen and letting it rise naturally. Will take about an 1+ 1/2 hours.


Pizza Sauce

1/2 tbs terriaki
1 tbs hoisin
1 tbs braggs or soy sauce
1/2 tbsp honey

Mix all ingredients together then brush a light layer over the pizza dough.

Sprinkle dough with toasted sesame seeds

Top the rest of your pizza with the remaining toppings with exception of cilantro and bake at 350'c for 15-20 mins or until the crust looks golden brown. Top with the fresh cilantro and more sesame seeds just before you serve it.

I know it does take a lot of time for preperation, but I promise it will be a hit even with the non-believers! This meal disappeared  even before I could take pictures ! So I had to make another one the next day. :)

Enjoy!

                                                                                 
(raw pizza)


(baked pizza)